Complete quadcopter building guide:
Hello everyone!
The first thing you need to do is to get the parts you need for your quadcopter. You could of course take a look int the “Parts” section above and look what i used for my quadcopters, or you could just look at the links below:
Quadcopter v2.0
Motors:
hexTronik DT750 Brushless Outrunner 750kv
ESC’s:
Battery:
ZIPPY Flightmax 2800mAh 3S1P 30C
Props:
Slow Fly Electric Prop 11×4.7SF RH Rotation (4 pc)
Slow Fly Electric Prop 11X4.7SF (4 pc)
Prop savers:
Prop Saver w/ Band 4mm (10pcs)
Radio (Rx/Tx):
Hobby King 2.4Ghz 6Ch Tx & Rx V2 (Mode 2)
Charger:
Imax B6AC 2-6s Balance Charger
Control board + power distribution board:
KK multicopter controlboard v5.5 with Xcopter configuration.
HobbyKing KKv2.1 Quadcopter controller board.
Frame:
15,2 mm Aluminum. Got it at my local hardware store.
Now, lets get on with the actual building shall we? Great! The first thing you are going to do is to make your power distribution thing. This could either be a wire harness that provides power to all the ESC’s, or it could be a so called “power distribution board” where you’ll solder on some wires that goes down to your battery, and then solder the 4 ESC’s to the board. Here you should be very aware careful about the polarity. An example of a power distribution board could be this:

This is the option i chose to use for my quadcopter. And the leads the are soldered on to the board is the way you should solder on an ESC, or connect an ESC to those leads.
The next thing you need to do is to solder on some bullet connectors to the motors and the ESC’s. And do always remember to put the male connectors on the motor and the female on the ESC. Otherwise you could get a pretty bad “shock”! I use 3.5 mm bullet connectors and soldered them on like this:

Remember to put heat shrink around them to make it “shock” proof! When you soldered all the Bullet connectors on check all you motors and ESC by connecting you ESC’s and motors (1 and 1) and plugin the ESC to the receiver channel 3 (throttle) and connect a battery.
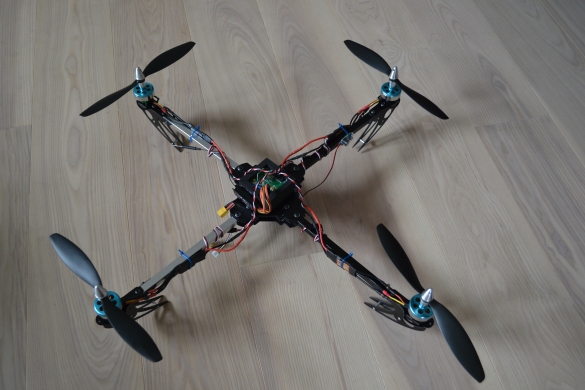
The next thing you need to do is to make a frame – (unless you bought a frame of course!) You need to cut 4 arms in aluminum – (or whatever material you are going to use) – which is the equal length.

As you can see my arms are almost 34 centimeters (33.8 to be exact). You also need to figure out the width/height of your square arms. Mine are as you can see in the picture below 15 mm.

the next thing you need to do us to cut out 2, 120 mm * 120 mm * 2 mm aluminum plates. Now you need to drill a hole 20 mm up each corner. and again a hole 20 mm from that hole. The middle of these holes should be at a 90 degree angle to each other. You of course have to drill some matching holes in the 4 arms.
Now you need to lay out the KK-board in the middle of the upper aluminum plate pointing the way you want to be the front of the quadcopter (Note the KK-Board has an arrow pointing towards the front). Mark up the holes of the quadcopter and drill some 3 mm holes. This way you can take som 3*16 mm nylon screws a little piece of some soft foam, and mount the kk board that way.

Just like that.
Now you need to use hot glue and mount the power distribution board on a small piece of rubber to avoid anything being disconnected or shorted as it’s being mounted on metal. After that simply glue the piece of rubber on to the inside of the bottom plate and mount the arms with some 4*25 mm bolts and locking nuts.
Your frame should look something like this at this moment:

Beginning to see the light at the of the tunnel now? Great! The next step should be pretty straight forward. Mount a motor on each end of the 4 arms. Connect the motors and ESC’s don’t worry about how to connect them now, just do it we’ll take care of the directions and connections later. Now connect the ESC’s power lead to the power distribution board.
Right now we need to connect the ESC’s to the KK-board. In the below illustration the numbers on the motors indicate which pin set they should be connected to at the KK-board. NOTE!!!: this setup is for the X-copter configuration with the v2.5 firmware.
Xcopter v2.5 by Minsoo Kim:
Motor 1 – should be at the upper left corner of the quadcopter (Clockwise rotating propeller)
Motor 2 – should be at the upper right corner of the quadcopter (Counterclockwise rotating propeller)
Motor 3 – should be at the bottom right corner of the quadcopter (Clockwise rotating propeller)
Motor 4 -should be at the bottom left corner of the quadcopter (Counterclockwise rotating propeller)
Xcopter v4.7 by KapteinKuk:
In this configuration the motor setup is a little bit different from the v2.5. The setup is now:
Motor 1 – should be at the upper left corner of the quadcopter (Clockwise rotating propeller)
Motor 2 – should be at the bottom left corner of the quadcopter (Counterclockwise rotating propeller)
Motor 3 – should be at the upper right corner of the quadcopter (Counterclockwise rotating propeller)
Motor 4 -should be at the bottom right corner of the quadcopter (Clockwise rotating propeller)
You now need to Connect the following between the KK-board and the receiver:
Aileron – channel 1 on receiver
Elevator – channel 2 on receiver
Throttle – channel 3 on receiver
Rudder – channel 4 on receiver.
Connect it all up and put the right propellers on the right motors, and you are almost able to fly your new HOMEMADE quadcopter!
Setting up the KK-board for the quadcopter:
Now comes the tuning and setting up the KK-board which can be a pretty nasty deal to figure out your self.
Step 1 – calibrate the throttle range on the ESC’s:
NOTE!!!!! Do not do this step with the propellers mounted!!!!
1. First you power your KK-board off.
2. Then you turn on your transmitter and put the throttle stick to maximum.
3. Move the “YAW”-pot on the kk board to the minimum position.
4. Turn on the KK-board ” should beep twice to tell you, you have entered “programming mode”.
5. Quickly after you heard the two beeps, move the throttle stick on the transmitter to the minimum position. The KK-board should say one beep to tell you throttle range calibration as ended.
6. Check if your motors start at the same time.
Now you just need to make sure everything is going in the right way (if not reverse the channels) and go fly!
Please comment or like this page to tell me if my work is good. Both positive and negative feedback will be read! Thanks!
/Martin

Great Idea! many people need this…
But 🙂
is it going to be a manual how to build the cheapest quad? quality of the motors, controller, charger what we see here are the worst on the market wright now…
Whats the purpose of this quad?
Yes. This guide is a guide, or manual to a cheap quad. Not the cheapest. It was meant so all people could build a cheap yet powerful Quad. I may need to make it more clear in the guide. 😀
Hey, this is a great tutorial! I am in the process of trying to find all the parts I want to be able to build one myself. I was wondering how heavy your frame was before you mounted any of the electronics. I want to buy a frame rather than build one at the moment and I wanted to make sure whatever frame I buy will fit seamlessly with the rest of your design. Do you think this one will work fine?http://www.hobbyking.com/hobbyking/store/%5F%5F24227%5F%5FHobbyking%5FX666%5FGlass%5FFiber%5FQuadcopter%5FFrame%5F666mm.html
It’s funny you ask! I just finished a few minutes ago building a quad on that exact frame with many of the same components as you see in this guide. Just one thing, get the turnigy Plush ESC’s and not anything else. You will get a much more stable quad with those ESC’s because they have a higher refresh rate.

Here’s some images of my new quad with the X666 Frame:
I wish you luck by building yours and i hope my quad has or will help.
/Martin
How did you mount the motors onto that frame? Do they fit or did you have to create a special mount?
I mounted them with Zip-ties to the frame so no need to drill anything or modify anything 😉
Very helpful comment!! The ESC’s in the picture of your quad are the HobbyKing SS which I have read are basically just rebranded Turnigy Plush’s. Am I correct? Is this setup as awesome for a beginner quad as it seems? The first reply to this guide has me a little hesitant. I was real curious about how much you like the quad and if there is any more advice you would offer to me. Thanks! I really appreciate it!!
No i don’t think so. First of all the SS-series is a lot cheaper, secondly, why would hobby king rebrand turnigy when they basically own it. Thirdly the Plush’s has a higher refresh rate than the SS-series which makes it a lot more stable and maneuverable. So pick the Plush’s and choose the KK2.0 from hobbyKing. And you’ll have a nice stable first quad!
/Martin
Sorry if my questions come across a little dumb, this is my first quad. Could I do the Turnigy Plush 30 amps. And is there anything wrong with the 3.0 control board from hobbyKing? Also, which propellers do you recommend as the best for the set up we are talking about?
Yes. Take the turnigy plush 30 a ESC’S. They have a higher refresh rate and therefore you’ll get a much more stable quad. No there is nothing wrong with the KK V3.0. But take the KK2.0 board and not the KK V2.1 board. There is a huge difference. The KK2.0 is the new generation KK board which have added a lcd screen for programming and selecting which mode you will fly. Besides the KK2.0 Have added a accelerometer which is a great thing! This adds the possibility for the quad to “auto level” itself, which basically means if your feeling insecure and about to crash just release the stick and it will be leveled. The board i am talking about is this board:
http://www.hobbyking.com/hobbyking/store/%5F%5F24723%5F%5FHobbyking%5FKK2%5F0%5FMulti%5Frotor%5FLCD%5FFlight%5FControl%5FBoard.html
So the KK v2.1 and the KK2.0 is two completely different boards. Stick with the KK2.0.
As for the propellers, if you’re going with the X666 frame i would suggest 10*4,5 propellers. I took the 11*4,7 props, but they turns out a little big.
And you need counter rotating and normal rotating props:
Normal rotating props:
http://www.hobbyking.com/hobbyking/store/%5F%5F22446%5F%5FSlow%5FFly%5FElectric%5FProp%5F1045SF%5F4%5Fpc%5F.html
Counter rotating props:
http://www.hobbyking.com/hobbyking/store/%5F%5F22447%5F%5FSlow%5FFly%5FElectric%5FProp%5F1045R%5FSF%5FRH%5FRotation%5F4%5Fpc%5F.html
This should be a very good beginner quad. Hope i helped you! You are very welcome to share this site with friends.
/Martin
WOW!!! Thanks! The KK2.0 in your original link is the older version so for the price, I was like “Why not get the 3.0?” but it totally makes sense now. Also, I was curious of what props to use. I can’ seem to find any CW and CCW 10×4.7 props on HobbyKing. So I was thinking about getting the 11×4.7 and the 9×4.7 and trying them both out when they get here to see which I like flying with better. However, HobbyKing does have the 10×4.5 in both CW and CCW. Would these possibly be what you were referring to?
I every time spent my half an hour to read this website’s posts every day along with a mug of coffee.
Hi, very good guide to setup, I have a kk board on my recently bought quad, I’ve managed to get it to a point where I can lift off but with major trim on the tx. At point 6 on your guide making sure the motors start at the same time, if this doesn’t happen how would you suggest to sort this out? Is there an easy way to calibrate them like the throttle or is it trial and error?
Hi. Try to follow the all the steps. This should make it work. If it doesn’t try to move the “YAW” pot the other way round and try it again. And if that doesn’t work you probably haven’t waited long enough when you powered up the quad.
How do you make the motors spinn in oposite directions
You take two of the wires coming from the motor to the ESC and swap them. So if you got the motors connected like this:
Motor side:
A B C
ESC:
A B C
Switch two of them – doesn’t matter which two:
Motor:
B A C
ESC:
A B C
Hope that makes sense 🙂
/Martin
Our quad is rolling to left after tuning.Is there sumthing that can be done.We are quite stuck up.
Thank you.
Hmm. that sounds weird. What board are you using? Flight controller i mean.
I want to know the parts for making quadcopter under Rs 2000 please email me
Question? What is the “YAW”-pot?
Psst, the link to this page on https://multicopterbuild.wordpress.com/how-tos/ has crashed.
Anyway, good info here, thanks!
It’s working for me. I’m sure it was just temporary 🙂
I calibrated the ESCs individually without the controller board. Do I need to re-calibrate the escs with the kk2.0 board in place? can’t fly stable either with or without flight stable on.
Yes you need to calibrate them together with the kk2.0 board, because the calibration can vary a little when you did the individually.
thanks. that might be my issue.
How much total does this cost?
Around 200 dollars.
Thank you
Thanks a lot for sharing your experience and advice. However, I have one question, if you wouldn’t mind answering it.
Most flight controller boards have an operating voltage of ~3-5 volts – if your battery gives a much higher voltage, how do you power your controller? I heard someone say you power it through an ESC, but does that mean you need an addition one (5 in total) to power it? How on earth do I go from 11v to 5v?
I’m really confused about this issue, so if you could help me understand that’d be a great help!
Thanks again 🙂
Yes you power it through an ESC, but you don’t need an extra one. The ESC’s all have a Built in BEC That outputs 5V. So when you Connect your signal lead from your ESC to you KK-board, it Will automatically draw 5V from your ESC. So theres nothing to worry about there 🙂
Hope That helps you 🙂
Martin.
Thanks a million!
This is a fantastic tutorial but can you please include the quantity of the items in the parts section.
Great work, and Thanks In advance!
Thank you! Yeah i will have a look at that 🙂
Martin.
Hello! I have several questions on building my first quadcopter because I’m doing it as a project for school. I could use your guidance badly so please email me at carltonjr12@yahoo.com.
Hello, very nice tutorial and thinking on making one. In the parts list section it says you need 8 propellers all together:
Slow Fly Electric Prop 11X4.7SF (4 pc)
Slow Fly Electric Prop 11×4.7SF RH Rotation (4 pc)
Is this a mistake? Shouldn’t it be 2 of each or am I missing out on something.
Yes you need 2 of each but you can only buy a set of 4 – therfore 8 in total 🙂
What other Flight Controller Board (preferably from Hobby King) would you recommend for a first time copter build? The KK2.0’s have been on back order for a good while now and it doesn’t seem like they are going to get any in stock anytime soon. There are a lot of boards that look similar but im not sure if they would have the features I need or not.
Thanks!
Well, the KK2.0 is definitely the easiest and quickest to setup, but you can get something more stable by buying the Multiwii pro board with MTK GPS from hobbyking. It is more difficult to setup and you’re dependent on a computer (or smartphone if you buy a bluetooth module) for tuning the settings. This will get you more stable flying, but a bit harder to setup if you don’t know what you are doing. I’ve got a video on my Youtube channel “MultiCopterBuild” that explains and shows the setup for a tricopter. It’s the tricopter part 11. Hope that helps:
https://www.youtube.com/watch?v=-uMiRgUW9Ns&feature=c4-overview-vl&list=PLCY1XsgXnvV0kfmDY41X6UxrzMsx3MN_y
Martin.
Ok thanks!
Also I am a little bit confused on the orientation of the board. I have seen them called a quadcopter Plus and X configuration. I think I would like to do an X configuration so then how would I orient the board?
Thanks again
There is an arrow on the board somewhere. Point the arrow in the direction you want it to fly forward. That means if you want an X-configuration you should point the arrow between the two front arms, but if you want a + configuration you should point the arrows towards the one arm that should be your front arm. Hope this helps. 🙂
Martin
Hi there, I was just wondering what sort of range, speed and life you would get out of the quadcopter above?
Thanks
and also what load you think it could carry (i.e could it support the weight of a GoPro?)
Well the range is probably around 1 km, but you wouldn’t be able to see the copter that far away unless you’re flying with FPV. And it would definatly be able to carry a gopro. I do not have that copter anymore, but when i did i think i was able to carry around 1kg. Hope that helped a bit 😉
/Martin.
Hello my motors are spinning but board not seem to work what can I do?
What do you mean by “board not seem to work”. What’s wrong with the board? It doesn’t correct itself or?
Nice.! But first of all please help me to get all the components required for a quadcopter project.
Go have a look under the “parts” tab in the top of the page, there you will find pretty much all the parts for the builds i did. Hope this helps and good luck 😉
/Martin.
Do you recommend waiting for the KK2.1 or purchasing the simpler one (http://goo.gl/6qJ6C9)? Thanks.
I’d recommend the brand new released KK2.1 not the V2.1 but just the KK2.1:
http://hobbyking.com/hobbyking/store/__49254__Hobbyking_KK2_1_Multi_rotor_LCD_Flight_Control_Board_With_6050MPU_And_Atmel_644PA.html
Much better than the V3 you linked to 🙂
Thanks! I was looking for at the wrong thing (goo.gl/tIiLsQ).
Hello Martin,
Thanks for putting this detailed guide. I am starting into quadcopters and your guide is extremely helpful. I have some confusion though:
What’s the difference between these two?
1)KK multicopter controlboard v5.5 with Xcopter configuration: http://www.ebay.com/itm/KKMulticopter-Flight-control-board-v5-5-config-XCopter-X4-Power-ESC-Boad-/260901565437?pt=Radio_Control_Parts_Accessories&hash=item3cbef1f3fd#ht_4674wt_986
2)HobbyKing KKv2.1 Quadcopter controller board: http://www.hobbyking.com/hobbyking/store/uh_viewitem.asp?idproduct=19534&aff=655899
Or are they the same things and substitutes for one another? And, if they are the same things instead of “HobbyKing KKv2.1 Quadcopter controller board”, can I buy “Hobbyking KK2.1 Multi-rotor LCD Flight Control Board With 6050MPU And Atmel 644PA” (http://hobbyking.com/hobbyking/store/__49254__Hobbyking_KK2_1_Multi_rotor_LCD_Flight_Control_Board_With_6050MPU_And_Atmel_644PA.html)?
Hello there!
Well the two boards is exactly the same, just a different colour i believe. I wouldn’t recommend you buying any of those two, but instead going with the last link you sent the KK2.1 with LCD display. It is much easier to setup and make it fly smoothly. Also it got better sensors and autolevel so should be easier to control and more stable to fly 🙂
Hope this helps,
Martin
Hello Martin,
Thanks for replying. Could you recommend a power distribution board for HobbyKing KK2.1 flight controller board?
Thanks,
Akshat
Hi I am hoping someone here can help me. I am trying to setup a KKmulticopter v5.5, quadcopter.
For some reason when I attempt to set throttle on all 4 motors, the Esc’s continue beeping as if they cannot see a signal from the Tx. It also does not seem to arm the board when I try. I have adjusted to reverse on all the channels save throttle on my spektrum Dx6i. I also tried moving the Yaw to both CW and CCW positions but to no avail. Can someone help?
Can you make the complete video guide of how to build a quad copter according to the above compatible components ?? Because, this is the first time that I am going to build. I am very new to this. Can you help me for my advanced project ?
I already did. Check out my youtube account: “Multicopterbuild” there you will find lots of multicopter builds 😉
Great tutorial. It looks so easy with it. I hope it will be easy when I will start to built my multicopter.
Thank you. It is very easy. You could also check out my youtube channel for more video builds: “Multicopterbuild” 🙂
That’s great article for me. I have a question which is
How to connect kk bord to battry
Great you enjoyed it. You don’t connect the battery directly to the board. You connect the battery to the ESC’s and those power the kk board through the servo lead 🙂
Hey nice article here!!
I am a first year college student. My friends and I are planning to make a basic quadcopter for now. We plan to keep the weight to one kilogram. For propeller we are thinking 10×4. Can you give details of the motor , ESCs and battery that should be sufficient.
Great project! For 10×4 props i would recommend 700-1000kv motors and 30A ESC. Look it up on Hobbyking – loads of great stuff. Definitely the Blueseries 30A ESC’s and probably some 700-1000kv MultiStar motors. And the battery you choose depends on the weight. But you could start with something like a 3S 3000 mAh 30C battery. Should be a good start 🙂